Displaying real-time shipping rates in WooCommerce is one of the single most effective ways to reduce cart abandonment and build customer trust. When shoppers see accurate, live carrier rates at checkout, they convert at higher rates — and you stop guessing what to charge. This guide walks you through everything you need to know to implement real-time shipping rates on your WordPress store.
Why Real-Time Shipping Rates Matter for WooCommerce Stores
Flat-rate shipping is simple to configure, but it comes with a hidden cost: you either overcharge customers (and lose sales) or undercharge (and eat the margin). Real-time rates solve this by pulling live pricing directly from carriers like UPS, USPS, FedEx, and DHL at the moment a customer checks out.
Studies consistently show that unexpected shipping costs are the #1 reason shoppers abandon carts. Showing accurate rates upfront removes that friction entirely.
What You Need Before Getting Started
- A WooCommerce store on WordPress
- Product weights and dimensions entered for each item
- A shipping origin address configured in WooCommerce settings
- A carrier API integration — which is exactly what EasyPost for WooCommerce by ThePluginForge provides
How EasyPost Powers Real-Time Shipping Rates in WooCommerce
EasyPost for WooCommerce is a WordPress-native plugin developed by ThePluginForge that connects your store to the EasyPost multi-carrier API. Instead of setting up individual carrier accounts and API keys for UPS, USPS, FedEx, and DHL separately, EasyPost acts as a single gateway to all of them.
Once installed, the plugin automatically queries each enabled carrier at checkout and returns live rates based on the customer’s address, cart weight, and package dimensions. No developer required.
Setting Up the Plugin Step by Step
- Install and activate EasyPost for WooCommerce from ThePluginForge
- Enter your EasyPost API key in the plugin settings
- Choose which carriers to display (UPS, USPS, FedEx, DHL, and more)
- Configure package presets or use per-product dimensions
- Enable the shipping method in WooCommerce → Settings → Shipping
- Test checkout with a sample address to confirm rates appear
The entire setup takes under 15 minutes for most stores. If you run into any configuration questions, ThePluginForge support team is available to help.
Optimizing Real-Time Rates for Conversion
Getting rates to show up is step one. Step two is making sure they convert. Here are proven tactics:
Display Multiple Carrier Options
Give customers choice. Showing three or four shipping options (economy, standard, express) lets price-sensitive shoppers pick what works for their budget while still offering speed for those who need it.
Use Friendly Service Names
Carrier service codes like “UPS_GROUND” or “FEDEX_HOME_DELIVERY” are confusing to customers. The EasyPost for WooCommerce plugin lets you rename services to plain language like “Standard Shipping (3–5 days)” so the checkout experience stays clean.
Add Estimated Delivery Dates
Customers want to know when their order arrives, not just what it costs. Displaying estimated delivery windows alongside rates is a proven conversion booster.
Common Real-Time Shipping Rate Problems (and How to Fix Them)
A few issues come up regularly when stores first enable real-time rates:
- Rates not showing: Usually caused by missing product weights or dimensions. Fill these in for every product in your catalog.
- Rates too high: Check your package presets — oversized box settings will inflate quotes. Use the smallest reasonable box size.
- Carrier not available: Some carriers restrict residential delivery or require minimum volumes. EasyPost’s dashboard shows which services are available for your account.
Real-Time Rates vs. Table Rate Shipping
Table rate shipping uses rules you define manually — for example, “orders over $50 ship for $5.99.” This works for simple stores but breaks down when you sell items of varying sizes and weights. Real-time rates scale automatically with every order, making them the better long-term solution for growing WooCommerce stores.
Conclusion
Adding real-time shipping rates to WooCommerce is one of the highest-ROI improvements you can make to your checkout flow. With the EasyPost for WooCommerce plugin from ThePluginForge, you get multi-carrier live rates without writing a single line of code. Set it up once and let accurate, dynamic pricing do the work of converting more shoppers into buyers.
Have questions about configuration? Visit ThePluginForge support for documentation and personalized help.
Frequently Asked Questions
Do I need individual carrier accounts to use real-time rates?
No. EasyPost acts as a single API gateway to multiple carriers, so you only need one EasyPost account to access UPS, USPS, FedEx, DHL, and more from your WooCommerce checkout.
Will real-time shipping rates slow down my checkout page?
EasyPost’s API is optimized for speed, and the EasyPost for WooCommerce plugin caches results intelligently. Most stores see rate results returned in under two seconds, which has no measurable impact on checkout conversion.
Can I show real-time rates and flat rates at the same time?
Yes. WooCommerce shipping zones support multiple methods simultaneously. You can offer a flat-rate option alongside live carrier rates and let the customer choose.
What happens if the EasyPost API is unavailable?
The plugin includes fallback configuration options. You can set a flat-rate fallback so checkout always works even if the carrier API is temporarily unreachable.
High-Performance Order Storage (HPOS) is the most impactful database improvement WooCommerce has shipped in years. Orders move from the overcrowded wp_posts and wp_postmeta tables into dedicated, indexed order tables — and the performance difference is dramatic. Here’s how to migrate safely.
Why HPOS Matters
Legacy WooCommerce stores every piece of order data — customer name, line items, shipping address, payment method, custom meta — in the generic WordPress post meta table. As your store grows, this table becomes enormous and queries slow down.
HPOS introduces dedicated tables: wc_orders, wc_order_items, wc_order_addresses, and wc_order_operational_data. These tables are purpose-built for order data with appropriate indexes, foreign keys, and query optimization. The result:
- Order list pages load in milliseconds instead of seconds on large stores
- Bulk operations (status updates, label printing, exports) complete faster
- Database server CPU usage drops significantly
- Scaling to 100,000+ orders becomes viable without custom infrastructure
Before You Migrate: Compatibility Check
The most important step is verifying plugin compatibility. Any plugin that directly queries wp_posts or wp_postmeta for order data (instead of using WooCommerce’s order API) will break with HPOS.
WooCommerce provides a compatibility report under WooCommerce → Status → Features. Plugins that are HPOS-compatible declare compatibility explicitly. Check every active plugin before proceeding.
Well-maintained plugins have already added HPOS compatibility — the TheForge EasyPost Shipping plugin is fully HPOS-compatible and has been since the feature entered beta.
Step 1: Create a Full Database Backup
This is non-negotiable. Use your host’s backup tool, WP-CLI, or a plugin like UpdraftPlus to create a complete database backup immediately before migration. Store it somewhere outside your WordPress installation.
Step 2: Enable Compatibility Mode First
WooCommerce offers a Compatibility Mode that runs both the legacy post tables and the new HPOS tables in sync. Enable this first — it lets you test HPOS while keeping legacy data intact as a fallback.
Go to WooCommerce → Settings → Advanced → Features → Order Storage and select “WooCommerce orders tables (compatibility mode)”.
Step 3: Run the Migration
After enabling compatibility mode, WooCommerce will prompt you to run the data migration. This syncs your existing orders into the new HPOS tables. The migration runs in the background via Action Scheduler — for stores with 10,000+ orders, this may take several hours.
Monitor progress under WooCommerce → Status → Scheduled Actions. Don’t run other heavy batch operations while the migration is in progress.
Step 4: Test Thoroughly
With compatibility mode active, test every order-related workflow:
- Place a new test order and verify it appears correctly
- Update order status and confirm changes save
- Generate a shipping label and verify tracking number saves to the order
- Process a refund
- Run an order export
- Check any third-party integrations (CRM, fulfillment, accounting)
Step 5: Switch to HPOS-Only Mode
Once you’ve confirmed everything works correctly in compatibility mode, switch to HPOS-only: WooCommerce orders tables (recommended). This disables the legacy post table sync and runs purely on HPOS.
You’ll immediately notice faster order list loads and quicker bulk operations.
Rollback Plan
If something goes wrong after switching to HPOS-only, you can re-enable compatibility mode, which re-syncs from the HPOS tables back to legacy. If that fails, restore your pre-migration database backup.
Is It Worth It?
For stores with 1,000+ orders, the performance improvement is immediately noticeable. For stores with 10,000+ orders, HPOS migration is essential — the alternative is a database that continues to degrade as you scale. Migrate now while your order volume is manageable rather than waiting until performance becomes a crisis.
Need help with the migration or plugin compatibility questions? Our support team is here to help.
Full Site Editing (FSE) arrived in WordPress 5.9 and has been maturing rapidly ever since. In 2025, with WordPress 6.9, it’s no longer experimental technology — it’s the direction WordPress is heading, and WooCommerce has been building to match. Here’s what store owners need to understand.
What Is Full Site Editing?
Full Site Editing means using the block editor not just for post and page content, but for every part of your site — headers, footers, sidebars, archive templates, single product pages, 404 pages, everything. Instead of editing theme files in PHP, you edit templates visually in the Site Editor (Appearance → Editor).
This only works with block themes — themes built specifically for FSE. Classic themes (most older themes, including many WooCommerce themes) don’t support the Site Editor.
Block Themes vs Classic Themes
The key differences:
- Classic themes use PHP templates, CSS files, and the Customizer. Familiar, widely supported, but increasingly limited.
- Block themes use HTML block templates, theme.json for global styles, and the Site Editor. More flexible, but requires learning the new paradigm.
Both continue to be supported in WordPress. But new WordPress features are being built for block themes first — including many of the WordPress 6.9 improvements like Zoom Out mode and Section Styles.
WooCommerce and Block Themes
WooCommerce now provides block templates for every store page — shop archive, single product, cart, checkout, account pages. These templates are editable in the Site Editor on block themes, giving you visual control over your store layout without touching PHP.
The WooCommerce block checkout (available on block themes) also loads faster than the classic shortcode checkout and supports more payment methods natively.
Should You Switch to a Block Theme?
Honest answer: it depends on where your store is in its lifecycle.
Switch if:
- You’re building a new store from scratch
- You want visual control over product page and checkout layout
- Your current theme is outdated and you need a redesign anyway
- You have a developer who’s comfortable with the block ecosystem
Stay on a classic theme if:
- Your store is running well and a theme migration would be disruptive
- You rely on heavily customized PHP templates
- Your key plugins don’t have block theme compatibility yet
Recommended Block Themes for WooCommerce
- Storefront (block version) — WooCommerce’s official theme, optimized for commerce
- Twenty Twenty-Five — the current default WordPress theme, excellent starting point
- Kadence — popular freemium option with strong WooCommerce integration
- GeneratePress — lightweight and performance-focused
Plugin Compatibility
Before switching to a block theme, verify your key plugins are compatible. Shipping plugins, payment gateways, and page builders are the most common friction points. Plugins built on modern WordPress APIs — like the TheForge EasyPost Shipping plugin — are fully compatible with block themes and the WooCommerce checkout block, so your shipping configuration carries over without changes.
Testing Before You Switch
Use WordPress Playground to test a block theme with your plugins before switching on your live store. You can verify the entire checkout flow — including shipping rate display — without risking live orders. Questions? Reach out to our team.
We have been working hard behind the scenes, and today we are excited to share everything that landed in the Smart COD Control v1.3 release cycle. This is the biggest update to the plugin since launch — two flagship features, a redesigned admin experience, and a stack of smaller improvements under the hood.
What Is Smart COD Control?
Smart COD Control is a WooCommerce plugin that gives store owners complete control over when Cash on Delivery is available at checkout. Hide COD by cart value, shipping zone, product category, customer history, and more — all without writing any code. It also includes fraud prevention tools to reduce fake orders and RTO rates.
New in v1.3.0: Visual Rule Builder
Before v1.3, setting COD rules required navigating separate settings panels for each condition type. The new Visual Rule Builder brings everything into one unified drag-and-drop interface.
Key capabilities:
- Create rule groups with multiple conditions
- AND logic within a group, OR logic between groups
- Filter by cart total, product, category, shipping zone, state, user role, coupon, and order history
- One-click pre-built rule templates for the most common use cases
- Rules activate instantly — no cache flush needed

New in v1.3.1: OTP Phone Verification
Fake COD orders are a significant cost center for stores in emerging markets. A customer who never intended to accept delivery places an order impulsively, you ship the product, and it comes back at your expense. OTP verification addresses this at the source.
When enabled, customers selecting Cash on Delivery must verify their phone number with a one-time SMS code before the order is placed. No code — no order. The friction is minimal for genuine buyers but effectively eliminates throwaway orders.
Supported SMS providers:
- Twilio — global coverage, straightforward setup with Account SID and Auth Token
- Vonage — competitive rates in South Asia and the Middle East, alphanumeric sender IDs

Enhanced Blacklisting and Approval Workflow
The blacklist system has been upgraded with a new admin approval workflow. Flag customers as requiring manual review — their COD orders go into a pending queue that your team approves or rejects before processing. This is ideal for stores with VIP or high-risk order tiers.
Fraud Analytics and Heatmap
The analytics tab now includes a geographic view of COD order activity. Spot regions with elevated cancellation rates at a glance and feed that data back into your Rule Builder to tighten restrictions exactly where they are needed.
Full Changelog
v1.3.1
- Added: OTP phone verification at checkout for COD orders
- Added: Twilio SMS integration
- Added: Vonage SMS integration
- Added: Customisable OTP message template
- Fixed: Rule Builder condition ordering edge case on save
v1.3.0
- Added: Visual Rule Builder with AND/OR logic
- Added: Pre-built rule templates
- Added: Drag-and-drop rule group reordering
- Improved: Admin UI redesign for COD settings
v1.2.0
- Added: Admin approval / blacklist workflow
- Added: Fraud analytics dashboard
- Improved: Performance on high-traffic stores
How to Update
Update via WordPress Dashboard → Plugins → Updates. All existing settings are migrated automatically — no reconfiguration needed. After updating, visit the new Rule Builder tab to explore the interface, and the OTP Settings tab to enable phone verification.
Questions or feedback? Reach us through the support page — we read every message.
Smart COD Control v1.3.1 supports Vonage (formerly Nexmo) as an SMS provider for OTP verification. Vonage offers competitive rates across South Asia, the Middle East, and Southeast Asia — regions where Cash on Delivery is most popular. This guide walks you through the full setup.
What You Will Need
- A Vonage API account (free trial available)
- Smart COD Control v1.3.1 or newer installed and active
Step 1: Create a Vonage Account
- Go to vonage.com and click Sign Up Free.
- Verify your email. Vonage provides free trial credit so you can test SMS immediately.
- Once logged in, go to the Vonage API Dashboard.
Step 2: Get Your API Credentials
- On the dashboard, find the API key and API secret at the top.
- Copy both values — you will paste them into Smart COD Control.
Tip: Never share your API secret publicly. Treat it like a password.
Step 3: Set Your Sender Name
With Vonage you can use an alphanumeric sender ID (e.g., MyStore) in most countries. Go to Account → API settings in the Vonage dashboard to configure your default sender name. Note that some countries (like India) require a registered DLT sender ID — check Vonage documentation for your region.
Step 4: Configure Smart COD Control
- Go to WooCommerce → Smart COD Control → OTP Settings.
- Toggle Enable OTP Verification to ON.
- Under SMS Provider, select Vonage.
- Enter your API Key and API Secret.
- Set the From Name (your brand name or phone number).
- Click Save Settings.
Step 5: Customise the OTP Message
Use the {otp} placeholder in your message. Keep it under 160 characters. Example:
Your MyStore COD verification code is {otp}. Do not share this code.
Step 6: Test It
- Open an incognito window and go through checkout.
- Select Cash on Delivery.
- Enter your own phone number and click Send Code.
- You should receive an SMS from Vonage within seconds.
- Enter the code and complete the order.
Vonage vs Twilio — Which Should You Choose?
| Feature | Vonage | Twilio |
|---|---|---|
| Best for | Asia, Middle East | Global / US-heavy |
| Pricing | Competitive in APAC | Standard global rates |
| Sender ID | Alphanumeric supported | Numeric only in many regions |
| Free trial | Yes | Yes |
Both providers work seamlessly with Smart COD Control. Choose based on your geography and pricing preference — you can switch at any time from the plugin settings without losing data.
Smart COD Control supports two SMS providers for OTP verification: Twilio and Vonage. This guide walks you through setting up Twilio — the most widely used SMS API worldwide — step by step.

What You Will Need
- A Twilio account (free trial is fine for testing)
- Smart COD Control v1.3.1 or newer installed and active
- A verified Twilio phone number
Step 1: Create a Twilio Account
- Go to twilio.com and sign up for a free account.
- Verify your email address and phone number during signup.
- Once logged in, you will land on the Twilio Console Dashboard.
Step 2: Get Your API Credentials
- Find the Account Info section on the dashboard.
- Copy your Account SID — it starts with
AC. - Copy your Auth Token — click the eye icon to reveal it.
Step 3: Get a Twilio Phone Number
- Go to Phone Numbers → Manage → Buy a Number.
- Filter by your country and ensure the number has SMS capability.
- Click Buy (free trial accounts get one number at no charge).
- Copy the number in E.164 format, e.g.
+14155552671.
Note: On a free trial, Twilio can only send SMS to verified numbers. Upgrade to a paid account to send to any number.
Step 4: Configure Smart COD Control
- Go to WooCommerce → Smart COD Control → OTP Settings.
- Toggle Enable OTP Verification to ON.
- Under SMS Provider, select Twilio.
- Paste your Account SID and Auth Token.
- Enter your Twilio phone number in the From Number field (include the
+and country code). - Click Save Settings.
Step 5: Customise the OTP Message
Use the placeholder {otp} where you want the code to appear. Example:
Your verification code for your COD order at MyStore is {otp}. Valid for 10 minutes.
Step 6: Test It
- Open your store in an incognito window and add a product to cart.
- At checkout, select Cash on Delivery.
- Enter a verified phone number, click Send Code, and enter the received OTP.
- Complete the order to confirm everything works.
Troubleshooting
- SMS not arriving — Double-check your Account SID, Auth Token, and From Number. Trial accounts can only send to verified numbers.
- Invalid credentials error — Re-copy credentials from the console and watch for accidental whitespace.
- Country not supported — Some countries require a local Twilio number. Check Twilio coverage docs.
Once connected, customers receive OTP codes within seconds and your COD cancellation rate will start dropping immediately.
Fake orders are the silent killer of COD profitability. A customer places an order impulsively, ignores delivery attempts, and your store absorbs the return shipping cost. Multiply that by hundreds of orders per month and the numbers get painful fast.
Smart COD Control v1.3.1 introduces OTP (One-Time Password) Phone Verification — a simple, effective friction layer that stops unserious buyers before the order is even placed.
How OTP Verification Works
- The customer selects Cash on Delivery at checkout.
- A phone number field appears with a Send Code button.
- An SMS with a 6-digit code is sent to their number via your configured SMS provider (Twilio or Vonage).
- The customer enters the code. Only after successful verification can they place the order.
- The verified phone number is saved to the order for your records.
The entire flow happens inline at checkout — no page reload, no redirect. It takes under 30 seconds for a legitimate customer and completely stops automated or throwaway orders.
Why OTP Is More Effective Than Blacklists Alone
Blacklists are reactive — you add a phone number or address after you get burned. OTP verification is proactive. Customers who are not serious enough to verify a real phone number will not proceed, and your inventory stays reserved for genuine buyers.
Studies from COD-heavy markets show 30–60% reduction in RTO (Return to Origin) rates after implementing OTP gating on COD orders.
Supported SMS Providers
- Twilio — global coverage, easy setup with Account SID + Auth Token
- Vonage (formerly Nexmo) — competitive rates for South Asia and the Middle East
Configuring OTP in Smart COD Control
- Go to WooCommerce → Smart COD Control → OTP Settings.
- Enable OTP Verification for COD.
- Choose your SMS provider (Twilio or Vonage).
- Enter your API credentials.
- Set the sender name / number that will appear on the SMS.
- Optionally customise the OTP message template.
- Save settings and test with a real phone number before going live.
OTP + Rule Builder = Complete Fraud Defense
Use the Visual Rule Builder to restrict COD to specific zones and cart ranges, and layer OTP verification on top. Together they give you the most complete COD fraud prevention available for WooCommerce — without any custom development.
Update to v1.3.1 from your WordPress dashboard to enable OTP today.
Cash on Delivery is one of the most popular payment methods in South Asia, the Middle East, and many emerging markets — but it comes with a catch: unverified orders, high cancellation rates, and fraud. Until now, controlling when COD is shown has required custom code or a patchwork of plugins.
Smart COD Control v1.3 changes that with a brand-new Visual Rule Builder — a point-and-click interface for building precise COD availability rules without touching a single line of PHP.
What Is the Visual Rule Builder?
The Visual Rule Builder is an admin panel that lets you create rule groups. Each group contains one or more conditions. Within a group, conditions are joined with AND logic (all must match). Between groups, logic is OR (any group can enable COD). This mirrors how professional rule engines work and gives you near-infinite flexibility.
What Can You Filter By?
- Cart total — e.g., disable COD for orders above ₹5,000
- Shipping zone / state / city — block COD for specific regions or pin codes
- Product or category — hide COD for fragile, perishable, or high-value items
- Customer order history — restrict COD for customers with previous cancellations
- User role — enable COD only for verified wholesale buyers
- Coupon applied — hide COD when a discount coupon is active
How to Build Your First Rule
- Navigate to WooCommerce → Smart COD Control → Rule Builder.
- Click Add Rule Group.
- Inside the group, click Add Condition and choose a condition type from the dropdown (e.g., Cart Total).
- Set the operator (is greater than) and value (5000).
- Add more conditions to the same group to AND them together, or add a new group to OR with the first.
- Set the group action to Hide COD or Show COD.
- Save. Rules take effect instantly at checkout — no cache clearing needed.
Pre-Built Templates
Not sure where to start? Smart COD Control ships with ready-made rule templates:
- Disable COD for high-value carts
- Enable COD only for specific states
- Hide COD for repeat cancellers
One click loads the template; you tweak the values to fit your store.
AND / OR Logic Explained
Think of it like a spreadsheet filter. If you need COD hidden when cart total > 5000 AND state is Maharashtra, put both conditions in the same group. If you want it hidden when cart total > 5000 OR product is fragile, put each in its own group.
Upgrade to v1.3 Today
The Visual Rule Builder is available in Smart COD Control v1.3.0 and above. Update via your WordPress dashboard or download the latest version from your account. No configuration migration needed — existing simple block/allow settings are preserved.
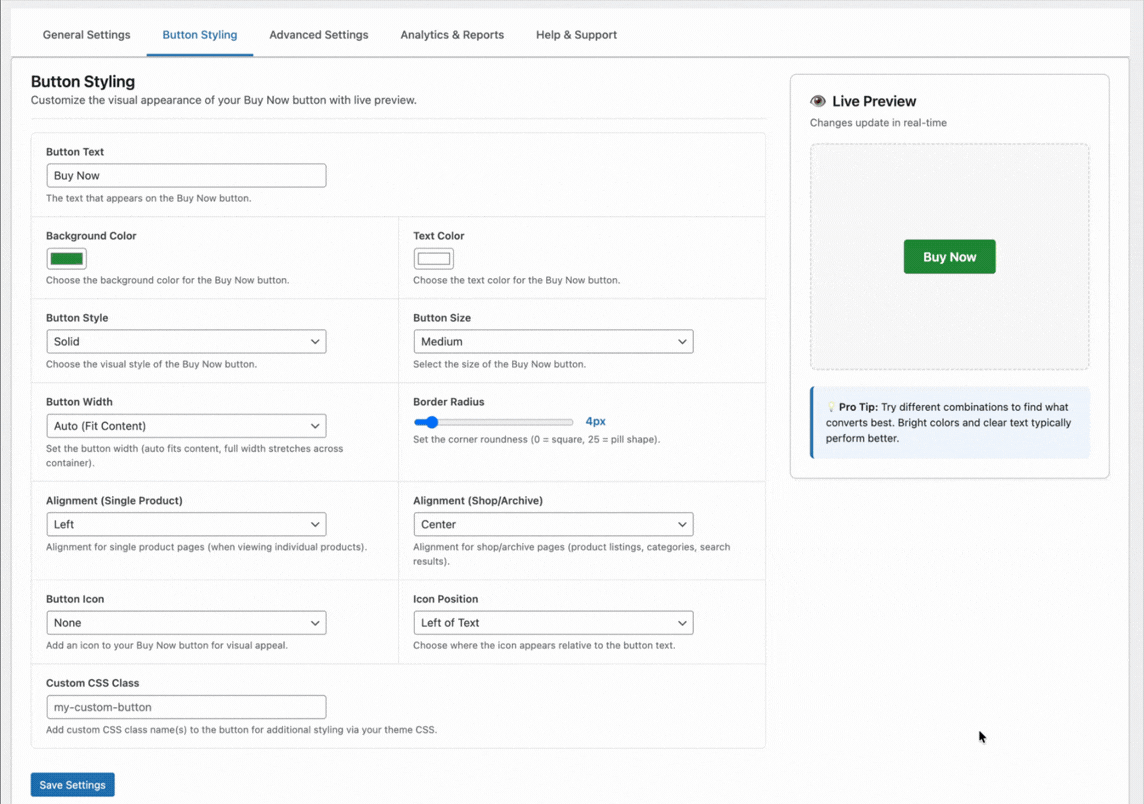
Traffic from a paid ad or email campaign is different from organic product discovery. The visitor has already been convinced to click — they have intent. What kills that intent is friction: a cart, unnecessary navigation, too many choices. The Buy Now button is built for exactly this scenario.
Landing Page Setup
A WooCommerce product page is also a landing page when you drive traffic directly to it. With the TheForge Buy Now Button plugin, you can configure that product page to show only the Buy Now button — no Add to Cart — and set it to clear the cart before checkout. The result is a single-focus page: arrive, choose options (if any), click Buy Now, pay.
Creating Dedicated Landing Pages
For higher-volume campaigns, you might want a dedicated landing page that’s not your standard product page template. Options:
- WooCommerce product page with a full-width template — remove the sidebar, header navigation, and footer links to remove distraction
- Page builder integration — embed the Buy Now button shortcode in a page built with Elementor, Beaver Builder, or similar
- Custom template — create a custom product template in your theme for landing page use
The Buy Now Button plugin provides a shortcode ([tpf_buy_now product_id="123"]) you can use anywhere in WordPress content.
Email Campaign Links
The most powerful use case: email campaigns with direct Buy Now links. Instead of linking to the product page and hoping the customer clicks through the cart, your email includes a “Buy Now →” button that takes them directly to the checkout with the product pre-loaded.
You can construct this URL using WooCommerce’s built-in cart shortcut: /?add-to-cart=PRODUCT_ID&quantity=1&tpf_bn=1. The plugin intercepts this request and redirects to checkout directly.
Facebook and Google Ads
For paid social and search ads that link to a product page, the Buy Now button reduces the post-click steps from four (product → add to cart → cart → checkout) to two (product → checkout). This typically improves your return on ad spend because fewer visitors drop off between the click and the purchase.
Measuring Ad Campaign Performance
Use the Buy Now Button analytics panel alongside your ad platform’s attribution data. Compare conversion rates for landing pages with the Buy Now button versus standard product pages. If you’re running A/B tests, the plugin’s click and conversion data complements your ad platform’s reporting.
Reducing Cart Abandonment for Ad Traffic
Cart abandonment is higher for ad traffic than for organic traffic — ad visitors are less committed and more likely to be distracted. By removing the cart page, you eliminate one of the highest-abandonment points in the journey for this traffic segment.
For campaign setup advice, visit the ThePluginForge support page.
Download Buy Now Button free →
Adding a Buy Now button to your product pages is a conversion optimisation. Like all optimisations, it should be measured. The TheForge Buy Now Button plugin includes an analytics panel that shows you exactly how the button is performing — which products are benefiting most and where customers are going.

What the Analytics Panel Shows
Navigate to WooCommerce → Buy Now → Analytics to see:
- Buy Now clicks — total button clicks over your selected date range
- Direct checkouts — how many clicks resulted in a checkout session
- Conversions — how many resulted in a completed order
- Buy Now conversion rate — percentage of clicks that became orders
- Revenue from Buy Now — total revenue from orders initiated via the Buy Now button
- Top products by Buy Now usage — which products customers are buying directly most often
Comparing Buy Now vs Cart Conversion Rate
The most useful analysis: compare the conversion rate for customers who use the Buy Now button versus customers who use Add to Cart. If Buy Now consistently converts at a higher rate, it’s confirming that removing the cart step is worthwhile. If they’re comparable, your cart page might already be well-optimised.
Identifying High-Intent Products
Products with high Buy Now usage relative to Add to Cart usage are products where customers arrive with strong purchase intent — they know what they want and just want to buy it. These products are good candidates for landing page optimisation, targeted advertising, and email campaigns with direct Buy Now links.
Using the Data to Optimise Button Placement
If some products have low Buy Now click rates despite high traffic, consider:
- Moving the button above the fold
- Making the button more visually prominent
- Changing the button text to something more compelling
- A/B testing button colour
Integration with Google Analytics
The plugin fires a custom event (buy_now_click) via the data layer that’s compatible with Google Analytics 4 and Google Tag Manager. You can track Buy Now interactions as custom events in GA4 and build funnels that include the button as a conversion step.
Documentation for analytics setup at the ThePluginForge support page.